Water Damage in Your Home

Water damage is one of the most common claims homeowners’ insurance companies receive annually. Whether slow leaks cause water damage over time or catastrophic flooding, it must be addressed immediately.

All Pro Services can stop the damage and prevent long-term destruction. Here’s how you can get started.

water damage

Various things can lead to water damage in your home, from natural disasters like hurricanes and floods to things you can easily prevent. A leaky refrigerator hose, for example, might not seem like much of a problem but over time can cause serious structural damage to your home. Keeping up with routine maintenance on appliances and your plumbing system will help avoid these problems. In addition, it is important to check the condition of your exterior walls and siding to make sure they are not cracking or leaking.

If you notice a crack in your foundation or basement wall, it is important to have it repaired before it becomes worse. Leaving cracks unattended will only allow more water to get in and could result in expensive repairs and restoration work.

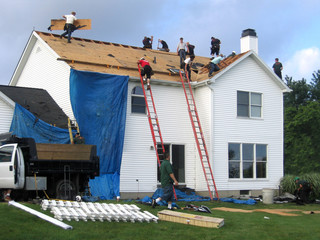
Water damage can also be caused by failed pipes, which are often the result of freezing, rust or corrosion. If you suspect a pipe has failed, it is important to hire professional water damage restoration specialists as soon as possible to minimize the amount of repair work needed.

The first step in water restoration is to remove standing water with a heavy-duty industrial vacuum and specialized machines. This is a critical step because it can significantly reduce the amount of restoration work needed. Once the standing water is removed, professionals can use a moisture meter to test for the presence of dampness in the walls, ceilings and floor.

Different types of water damage require different approaches to restoration. The type of water will also affect the cost of the restoration project. The severity of the damage is classified as either class 1, 2, or 3, depending on the source of the water. Class 1 is considered clean water and comes from sources such as falling rain or melting snow. Class 2 is contaminated water and comes from sources such as kitchen sinks, washing machines or toilets. Finally, class 3 is the worst kind of water damage and contains microorganisms that can cause disease.

It is important to keep in mind that the majority of water damage is preventable. Vigilance and prompt action can help you spot problems before they escalate into major issues that require costly repairs and restoration work. Inspect your plumbing regularly and be on the lookout for any unusual spikes in your water bill. These spikes can indicate that there is a leak or that you are using more water than usual.

Water damage is caused by flooding and persistent rain, but it can also be the result of manmade incidents such as leaky pipes and faulty appliances. These issues cause gradual moisture accumulation that can eventually lead to mold, dry rot, and structural damage. It is important to recognize these issues and take the necessary measures to prevent them.

Water leaks are the leading source of home insurance claims, costing an average of $5,092 per incident after the deductible. In the majority of these cases, plumbing supply system material failure is to blame. This is the reason that it’s important to have your plumbing systems regularly inspected and maintained.

In addition to the aforementioned warning signs, there are other ways that you can identify water damage. For example, a sudden onset of respiratory problems may be indicative of a mold problem resulting from a water-induced leak. Likewise, a musty smell may indicate that there is rotting wood within your structure.

Another way that you can spot water damage is by looking for discoloration on walls and ceilings. This is often caused by unseen leaks that can go undetected for a long period of time.

It’s important to note that it can take months or even years for a hidden leak to become visible. This is because water causes deterioration in porous materials like drywall and carpeting, causing them to degrade over time.

Moreover, it is crucial to know how to determine whether water marks on a wall are new or old. Fresh watermarks will appear wet and may even have a noticeable line, while old ones will appear faded and dry.

Water stains and brown spots on ceilings, walls and floors are typically caused by undetected water leaks. While it’s impossible to prevent the effects of extensive and long-term water damage, you can take steps to prevent smaller issues such as small stains and minor discolorations. This can be done through regular maintenance and inspection of your property by a professional. In addition, using devices such as water flow monitoring systems can help you avoid costly water damage in the future.

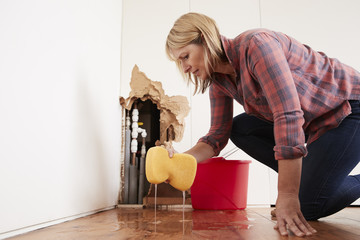
Once the source of the water damage is stopped and power has been turned off, the cleanup and restoration process can begin. This is a job that should only be done by professionals unless you have the proper equipment and experience. It’s important to understand how different materials will interact with water and how much time it takes for certain items to become affected. For example, thick paint will absorb water more than thinner paint and tiles. Also, drywall and carpeting will absorb water at a different rate than wood. Knowing what makes up your home will help you better assess the amount of damage and how it needs to be addressed.

When you’re getting started with the cleanup process, turn off any appliances that are connected to gas lines and shut off your home’s main water supply. This will prevent further damage and reduce the risk of electric shocks or fires. It’s also essential to unplug any electronics that may be affected by the water. Continuing to use them could lead to permanent damage and even electrical failure. Once this is done, it’s a good idea to open windows and doors in order to promote airflow and speed up the drying process.

It’s also a good idea to remove any items that are already showing signs of water damage, such as swollen photographs, books and paper goods. This will allow for a quicker assessment of what needs to be replaced and it will also make it easier for the professional to dry out the remaining items.

Once any visible signs of moisture have been removed, it’s time to start mopping and using towels, dehumidifiers and fans. It’s also a good idea to disinfect the area with bleach or an alternative cleaning solution to ensure that any bacteria and spores are killed.

It’s important to remember that it doesn’t take long for standing water to breed mold and mildew, which can be incredibly dangerous. These microorganisms can cause serious health problems, including allergies, asthma and respiratory conditions. In addition, they can cause rot and other structural issues in your home.

Water damage is a common problem that has many potential causes. Floods, heavy rainfall, and burst pipes are often to blame, but there are also more hidden sources like faulty appliances or leaky plumbing. Even if these problems aren’t obvious at first, they can lead to long-term issues like mold, mildew, and structural damage to the home’s foundation.

The best way to prevent these problems is by being proactive about home maintenance. A comprehensive plan should include a checkup of plumbing systems, an assessment of weather-related vulnerabilities, and an inspection of the structure’s foundation. In addition to checking all of these areas, it’s important to develop a checklist for routine exterior maintenance tasks. These should include checking and cleaning gutters, disconnection of hoses in the fall, grading the soil around the house to keep water away from the foundation, and regular maintenance on HVAC and sprinkler systems.

Some of the most common problems caused by moisture in homes are mold and mildew, rotted wood, and warped or sagging walls. These problems can be expensive to correct and can have lasting health impacts for the occupants. In addition, they can cause serious structural damage to a home’s foundation, and they can also affect electrical wiring and create a breeding ground for pests.

One of the most common reasons that mold and mildew grow in a home is because of moisture from leaky pipes or fixtures. This is why it’s important to check and replace all aging appliances and fixtures to prevent future leaks and other problems.

It’s also important to regularly clean your gutters to avoid buildup of leaves and debris that can block a downspout or lead to flooding. Also, be sure to disconnect all hoses and garden equipment in the fall before the rainy season starts. This will prevent them from freezing and bursting, which could lead to broken pipes in your home.

A hygrometer is an easy and inexpensive tool to help monitor humidity levels in your home. High humidity is a contributing factor to hidden leaks and other water damage, so keeping this level in your home as close to ideal as possible can help prevent costly repairs down the road.

remodeling

How Much Does a Kitchen Remodeling Cost?

A well-designed and functional kitchen makes life at home more enjoyable. But the costs of Kitchen Remodeling Lexington KY can add up quickly. Materials make up the largest percentage of remodel expenses. Installing new cabinets and hardware is expensive, but high-quality materials last longer and look better than cheap alternatives. Switching to energy-efficient appliances and plumbing fixtures can also save you money in the long run.

Cabinets

remodelingThe biggest expense in a kitchen remodel is new cabinets, which can account for 14 to 41 percent of the total project cost. The exact amount depends on whether you’re planning to refinish or replace your cabinets, and the material you choose for them. Plywood and wood veneers tend to be cheaper than solid wood options.

If you’re on a tight budget, try to minimize installation costs by buying ready-to-assemble cabinets or finding bargains at the Habitat for Humanity Re-Store. You can also save on demolition costs and local dump fees by removing your old cabinets yourself and hauling them away to be recycled or donated.

If you decide to hire a professional to install your new cabinets, be sure to compare quotes from multiple companies. And don’t forget to factor in the cost of new paint and hardware for your cabinets, as well as any labor to remove and reinstall existing plumbing or electrical fixtures. Resist fancy add-ons, like cabinet and drawer dividers or vertical spice racks, that can increase your project costs. Instead, prioritize your must-have features and stick with standard drawers and cabinets that won’t break the bank. This helps keep your budget intact for more important upgrades later on in the project, such as a fresh coat of paint or a brand-new dishwasher.

Countertops

The cost of countertops varies widely based on the material you choose and your location’s labor rates. The National Kitchen and Bath Association estimates that countertop expenses account for 11% of total kitchen remodel costs.

Budget-friendly materials like tile or laminate can save you 50%-80% compared to granite. Quartz is another popular option, but it can be pricey. It’s heat-, scratch-, chemical-, and stain-resistant and comes in a variety of colors and patterns.

When choosing a countertop, consider your goals and lifestyle. For example, if you’re thinking about selling your home in the future, you may want to opt for high-quality counters that will increase the value of your property.

Make sure to take into consideration the type of edging you want and any cutouts, as these can add significantly to your countertop’s overall cost. Standard edging options include eased, beveled, or bullnose. You should also consider the cost of disposal and installation. Labor charges vary by contractor and can depend on the size of your project, the style of your kitchen, and whether you’re changing the floor plan. Also, any specialty work, such as rewiring lighting or moving plumbing or gas lines, will increase your cost.

Appliances

A kitchen remodeling project includes the installation of new appliances. This includes a range, oven, microwave, dishwasher and refrigerator. The costs of these vary depending on the brands and features chosen, but a typical appliance package runs between $2,500 and $4,300 with installation.

The addition of kitchen lighting is another key element to consider during a remodel. This can include ambient ceiling lights, pendants or chandeliers over the kitchen island or dining table as well as task lighting, like under-cabinet lights or LED strip lighting, in drawers and cabinets. A good rule of thumb is to plan on spending $500 to $2,000.

It’s important to consider your goals and how they relate to the resale value of your home when choosing products and materials for your remodel. For example, investing in high-end finishes may be more expensive, but they can add significant resale value if your property is in a popular area. Likewise, it’s not smart to knock down walls just because you want to open up the space; some walls are load-bearing and require professional help to remove. Be sure to work with an experienced contractor to avoid any surprises that may come up during the project.

Flooring

Depending on your flooring budget, you can choose from a wide variety of materials. Vinyl, resilient, or tile are all popular choices for kitchens because of their durability and affordability. Laminate offers a stylish look with little maintenance. For a more luxurious floor, consider natural stone like granite or marble. These floors are more expensive but add a sophisticated feel to the room.

You’ll also need to budget for new walls and ceilings. Replacing existing drywall can cost $2 to $6 per square foot, while a fresh coat of paint will run you $300 to $750. New piping can be pricey, too, especially if you’re switching from copper to CPVC pipes.

It’s important to remember that kitchen remodel costs can quickly add up, so you want to stick to your budget and only do what you can afford. For example, if you’re remodeling a small kitchen on a budget, it might make more sense to save money where you can by installing reused cabinets or using recycled materials instead of new countertop products. You should also focus on high-return improvements like painting walls and installing a new light fixture that will instantly add value to your home.

Lighting

Homeowners often encounter various terms with similar meanings when researching kitchen remodel prices. To avoid any confusion, homeowners should clarify the lingo with their contractor before making any major decisions. For example, a renovation may be a small change or addition, while a remodel is more of an overhaul. Additionally, a major/upscale remodel is typically more expensive than a standard remodel because it includes high-end and specialty items.

Kitchen cabinets are a significant cost for any remodel. The price of stock cabinets varies depending on the material, while custom cabinets are more expensive. Countertops can also vary in cost. The type of material, thickness, and shape all affect the final cost. Additionally, finishing options like edge routing or honed natural stone can increase the cost.

Upgrading your kitchen lighting is a simple but effective way to improve the look of your kitchen. A DIY swap of your outdated sink light for a farmhouse-style pendant costs about $50, while hiring a professional to install sleek recessed lights can run you $150 per fixture.

Some electrical projects are necessary during a kitchen remodel, including adding GFCI outlets and moving electrical outlets away from water sources. These updates can make your kitchen safer and more efficient.

Plumbing

If the kitchen’s layout remains largely unchanged, plumbing costs should be relatively low. However, changing the location of a sink or faucet can quickly increase these costs. For example, moving a sink from one side of the room to another could require the installation of new drain lines and gas or water supply pipes, and may even require the relocation of existing plumbing.

Installing new windows and doors can also add to the cost of a kitchen remodel. These costs can vary significantly depending on how many doors and windows are being installed, as well as their configuration. For example, installing a window that opens to the outdoors can be more expensive than a window located in a wall.

In addition to these fixed costs, homeowners should consider the cost of labor. It’s a good idea to obtain multiple quotes and choose contractors carefully, making sure they are licensed and insured. In general, a homeowner can expect to spend 20%-35% of the total kitchen remodel cost on labor.

Electrical

Changing the electrical system in your kitchen can be costly. It’s important to determine what you want versus need in your remodeled kitchen and plan accordingly. For example, it’s not just about the number of lights, you also need to think about the power required for appliances, a dishwasher, and possibly even a new refrigerator.

Moving and rerouting piping and plumbing is a big cost consideration, as well as adding more outlets or upgrading to energy-efficient options. If you’re remodeling an older home, the wiring might need to be replaced altogether. This can add up quickly when the electricians are at work and requires time and materials.

Choosing the right materials for your kitchen will also impact the final cost of your project. Natural stone products like granite and quartzite are luxurious choices with a price tag to match, while other durable options such as ceramic tile can be less expensive and still offer an attractive look. Regardless of what you choose, it’s best to come up with a budget early and be prepared for unexpected expenses during the project. This way, you won’t go overboard and risk putting your house up for sale at a later date.


concrete repair

What You Need To Know About Concrete Repairs

The main thing to know before you apply any repair is its modulus of elasticity. You need to also know the size of the area to be repaired, the application method, and the durability of the repair. If you don’t know all of these things, you can ask the repair expert to help you choose the right concrete repair for you. After all, the right repair will help your building look great, and it will make you feel good too! To get this done, call Level Ground Excavation today.

concrete repairModulus Of Elasticity

The strength of the repair material is determined by its modulus of elasticity or MOE. Ideally, the material should exhibit the same MOE as the original concrete to allow for uniform load transfer across the repaired area. However, the actual MOE of the repair material will vary depending on its application. For general repairs, a lower MOE means more flexibility and a higher MOE means more stiffness. To achieve a good bond, you should thoroughly prepare the repaired area before applying the repair material. 

The first step in determining the strength of concrete is to understand how it reacts to stresses. The modulus of elasticity of concrete is the force applied to the material to cause a structural response. The stronger the concrete, the stronger the structural response. The next step is to calculate the stress. Fortunately, concrete has excellent properties for this type of stress. The strength of the repair material can be measured using a cyclic load.

When a repair material is applied to concrete, it must be able to withstand high shear stresses. This is possible only by assessing its bond strength against the concrete’s underlying strength. The repair material can contain polymers and other additives to enhance its bonding capability, but it can only be as good as the weakest link. The weakest link is typically the concrete’s surface. Therefore, it is imperative to carefully prepare the repair area to maximize bond strength.

In addition to the compressive strength, the modulus of elasticity of concrete also increases with age. Although the two are not equal, the increasing rate of elasticity of concrete is smaller than the increasing rate of compressive strength. This difference may be due to the fact that the case material’s modulus of elasticity is higher than its grain. It can be as high as 1000 psi. It is important to ensure that you are using the right mix to repair damaged concrete.

The elastic modulus of concrete is determined using an empirical formula. Using this formula, you can calculate the elasticity of concrete with a single test. The results of the test are recorded in a stress-strain graph, also known as a load-deflection graph. The slope of this curve is the modulus. This can also be compared to the compressive strength of concrete after 28 days.

Application Method

The best method for applying repair materials is a combination of two different types of preparation. The preparation should be done at least a few days prior to the repair work and should not involve vibrations. Alternatively, the concrete should be self-consolidated. Depending on the type of repair, engineers may request a concrete test cylinder to determine the compressive strength of the concrete mix. The results of the test cylinders may be used as the concrete repair material. When the repair material is placed, the forms should be tightened, but not so tightly that they can’t be removed easily. When the repair material is applied, it must be allowed to dry for 72 hours with the forms in place. Wet mats should also be placed over the openings used for the placement of the material.

The material should be selected based on its properties and the type of damage to the concrete. Depending on the severity of the concrete damage, there are several repair mortar types to choose from. Those used for structural repairs should have a similar modulus as the concrete substrate. Nonstructural repairs may be made of materials with a lower modulus. In addition, repair mortars should have inadequate shrinkage compensation to prevent cracking after placement. Other properties that are important for a repair mortar include bond strength, permeability, water vapor transmission, and tensile and flexural strength. In addition to the above properties, surface preparation is critical to the success of the repair installation.

While routing cracks requires more labor, it can be an effective way to repair structural cracks. Concrete cracks are best repaired when the joint is low-modulus and accommodates movement. If the crack is active, moisture-tolerant epoxies are best for the job. Cracks that are wet can also be treated with these materials, but the effectiveness of the resin will depend on the number of contaminants present. While a low-modulus adhesive can be applied in cracks, it won’t allow significant movement of the concrete structure.

Another consideration when repairing a concrete structure is its depth. A thick section can generate excessive heat during the curing process of certain repair materials. A thin layer of concrete may experience spalling or delamination as it contracts and expands during colder months. Another consideration is the material’s coefficient of thermal expansion. Unless the repair material suits the particular concrete type and structure, the repair will most likely fail due to shrinkage. The bond between the repair material and the concrete is essential in ensuring that it adheres well and doesn’t debond.

Durability Of Repair

The most important parameter for evaluating the durability of concrete repair mortars is the bond between the repair mortar and the substrate. The right bonding strength ensures that the repair mortar withstands stresses that arise at the interface between the two materials. There are several factors that influence this bonding strength. Let’s take a look at a few of them. Firstly, morphology should be considered. The surface appearance of the cement-based repair mortar should be smooth.

Secondly, erosion resistance should be evaluated. Tests to assess erosion resistance involved the application of acid-base solutions with 5% HCl and H2SO4 by weight and a saturated NaOH solution. Then, samples were subjected to freeze-thaw cycles. The freezing temperature and 50% RH caused the concrete to shrink in two directions. Both methods resulted in cracking in the repair material. However, a test to assess the durability of concrete repair materials in this temperature range revealed that the ECC material was less susceptible to cracking than the FRPM mortar.

In addition to these tests, another factor that determines the durability of concrete repair materials is their compatibility with the structure. However, cement-based repair materials have been the subject of little research. As such, they can deteriorate just like conventional concrete. In addition, two additional factors affect the durability of concrete repair: its permeability and chloride diffusivity. Both of these parameters affect the penetration and degradation rate of aggressive substances.

In addition to addressing corrosion and abrasion, the durability of concrete repair materials is essential for conserving resources. Furthermore, they help to minimize the environmental impact of the repair process. When replaced, replacement building materials deplete natural resources and pollute the air. By its nature, concrete has the ability to resist chemical attacks, weathering action, and abrasion. While different concretes need different durability, the exact combination of ingredients and concrete placement and curing practices determine the durability.

The first step in repairing a concrete floor is to clean the surface thoroughly. It would help if you did this before mixing the concrete. Different types of concrete require different mix ratios, and some harden faster than others. Then, mix the concrete no more than you can use in the next 30 minutes. After mixing, you must let the mixture dry thoroughly. After this, you can apply a new layer of concrete.

If you are unsure whether you need concrete repairs, take a walk through your home. Notice if the soil is moving or settling. If you notice any areas that are uneven, call a contractor right away. A professional will also be able to replicate the original design of the concrete and mix it for increased durability. If you’re unsure of your abilities, learn more about the process and hire a professional.

A repair job is a great way to improve the look of a concrete surface. While concrete replacement is necessary for a major crack, small cosmetic repairs can be performed to fix the problem and keep it from getting worse. This way, the concrete surface remains strong and safe for use. This way, you don’t have to worry about a cracked floor any longer. You can even do a concrete patch job to make your steps look new again.

After repairing your concrete floor, make sure you understand the causes of the damage so that you can choose the right repair method. Once you understand why your concrete floor is damaged, you can start removing the damaged concrete or contaminants. Then, apply a repair designed to solve the problem. Don’t forget that a concrete repair should be durable and withstand the test of time and wear. If you are unsure about what you’re doing, consult a professional who specializes in concrete repairs.

Roofing Contractor Requirements and Costs

Whether you are a homeowner who needs to replace the roof on your home or a commercial contractor looking for an expert to handle the roofing of your building, there are a few things you need to consider. These include licensing requirements and costs associated with the work. When you are a roofing contractor, there are many different license requirements you must follow. Check with your local licensing office to ensure you comply. You may also be required to take certain training courses or undergo special registration. Roofing Services

Roofing is the best roofing contractor with a solid grasp of their trade. Ask them about their warranties, and if there are any terms or conditions you should know about. Make sure they send you documentation in a timely manner. The type of license you’ll need depends on the type of work you perform and your local jurisdiction. Some states require a general contractor’s license, while others do not. In addition to a state-issued license, roofing contractors also need a business license and a surety bond.

As a licensed roofer, you’ll receive a basic insurance policy that protects you against damages, injuries, and unpaid bills. You’ll need other kinds of insurance, such as liability insurance. It’s important to check with your insurer before you begin working.

Requirements for work on residential and commercial structures. There are many requirements to keep in mind regarding construction projects. From licensing requirements to building codes, one has to be prepared for anything. If you’re looking to make your name in the contracting arena, consider the benefits of having a diversified background in your employ. Luckily, there are companies whose mission is to protect your bottom line. In addition to licensing and regulatory compliance, they offer a wealth of perks and incentives, including onsite safety, stipends, and discounted insurance. Not to mention, they’re there when you need them most. For a small fee, you can be armed with the knowledge and tools to ensure your project is completed on time and within budget. Likewise, if you’re a newcomer to the industry, you’ll be well served by a staff of like-minded professionals.

Liability for replacing fasteners that extend beyond the bottom of the flutes. The DX 860-HSN is a semi-automatic decking tool whose primary function is to attach metal decks to steel base materials. It features a 40-nail magazine and a high fastening rate. A fall protection system may be included. Similarly, a core cutter may remove old materials before the deck is reassembled. In addition, a high-tech, watertight seal is employed between the old and new sections of the roof.

In terms of the actual construction, the 60-mil EPDM single-ply membrane has fully adhered to the roof surface. A series of waterproofing layers on the ground is applied to the substrate to keep out rain and snow. Finally, a polyurethane watertight seal is applied to the joints between the existing and new roof parts.

If you’re planning to hire a roofing contractor to replace your roof, it’s important to know what to expect in terms of costs. A few variables can have a big impact on the overall cost. For example, material prices vary, and your local building codes can also affect the cost.

In most cases, materials used to repair or replace a roof account for 40 percent of the total cost. The type of materials you choose is important. While asphalt shingles are the most common roofing material, natural stone and metal are other options that may work better for your particular needs. There are a number of different roofing materials to choose from, including slate, wood, metal, and tiles. Slate is a durable, natural material that can last over 100 years.

If you’re planning to replace or repair your roof, you’ll want to be sure you get a top-notch job. The roofing industry is a highly competitive one, and you need to find the right contractor to ensure you’re not getting ripped off. There are a few things to look for, but a few simple questions can help you find the perfect match.

The roof is a significant investment, and you want to know you’re getting the best deal possible. You should compare bids and see which contractor provides the best value. Some companies will offer to discount their prices for certain services, and you should be able to negotiate a fair price with your chosen pro.